Posts by kevinh

    Hello everyone,

    We at Basler started an Innovation Project to offer Python Programming for FPGAs on our Hardware. In the background Visual Applets is used, however you can now steer it with Python.

    If you wish to know more about this topic you can check out this link: https://www.baslerweb.com/en/i…/fpga-programming-python/


    If you wish to have a discussion about this topic please contact me directly or use the link at the bottom of the page mentioned in the link above.

    Best Regards,


    Kevin

    Hi,

    Sorry for the late reply.

    Please try / investigate:


    1. What is the size of the file on the disk? if it is 0Kb or 1Kb the data is lost, probably due to synchronization issues with OneDrive
    2. VisualApplets 3.4.0 was just released, you can download it here: https://www2.baslerweb.com/en/…anguage=all;version=3.4.0 and see if this works
    3. I do not know the target platform of your design . If you have a plattform that is no longer supported by VisualApplets or was installed by a plattform installer you may need to install the plattform first
    4. If all these steps do not help you, you may upload a file here (or send via Mail) and we can see if we are able to track down the issue and hopefully can retrieve your designs


    Best Regards,

    Kevin

    Dear Bingnan,

    Sorry for the late reply. Please try the following steps:

    1. Check if you lower the frame rate at which point there is no longer an overflow (best to start with 1 FPS and then increase it until it overflows)
    2. Next to changing the camera parameter you must also adapt the value "YLength" and "XLength" of the FullResBuf in your design according to the RoI of the camera, because otherwise the Buffer will add Dummy pixels. This might cause an overflow.
    pasted-from-clipboard.png

    Best Regards,

    Kevin

    Hi Simon,

    Sadly this is not possible to do with a TCL command. However, here are two workarounds that may work:

    You can read out the TargetPath Variable from the VisualApplets.ini, depending on how you installed VisualApplets you may find the VisualApplets.ini under C:\ProgramData\Basler\VisualApplets\<VERSION> or under your Installationfolder. Under this path several subfolders for each plattform are created where then the .hap files are stored with its name from the .va file.

    Another approach relies on setting a different variable like the UserLibDir variable to the same location as the target path under your System settings.

    Then you could use the following syntax to obtain files:


    set designHapPath [GetAbsolutePath "%UserLibDir%/../Designs/<PlatformName>/<DesignName>.hap"]


    I hope this may help to solve your problems.


    Alternativaley, you may contact me via E-Mail, if you are interested we can look if it would be easier to solve your task with the help of PyWizion.


    Best Regards,

    Kevin


    Hello Bingnan,

    I am currently quite busy, so answers may take a while or won't cover the full detail.


    To your question: "1. The trigger example seems to be receiving an external trigger signal, then triggering the camera. How can I make the output-triggering signal controllable?"

    If you open the "Hierachical Box" you will find the following layout:

    pasted-from-clipboard.png

    In the "Select" Operator you can choose the Triggermode, in your case the one you are looking for is the setting "1", so that the signal from "Generator" gets used as a Trigger.

    If you go deeper into the "Generator" you can see the following:

    pasted-from-clipboard.png

    The Operator "Period" can then adjust your signal. Please read the textboxes for further instructions on how to adjust the trigger signal.

    To your secon question:
    "2. With the "Overflow", is that means I can use a larger template? Or it is limited by the resources the "Overflow" controls transfer bits but no effect on this?"

    The overflow operator CUTS off an image, when a memory element is not capable of holding saving the image.
    As you can see in your screenshot from MicroDisplay you have a "1" on Overflow. This means that the memory is not capable of saving the required data with the chosen bandwidth.


    The following screenshots describe areas where you have bootlenekcs in your design:
    pasted-from-clipboard.png

    This will result in your processing pipeline only be able to handle 125 MegaPixel/s , since the SYNC operator creates dummy pixels.

    Also after this HBox you have a ParallelDN that will limit your bandwidth.

    This is all the help I can give you at the moment, please try to remove those bottlenecks, with operator suchs as ParallelUP before the SYNC operator etc.

    Best Regards


    Kevin


    Hello Bingnan,

    I looked at your design, and the first thing I noticed was the parallelDN right after the ImageBuffer at the beginning. I do not know how fast your camera is set, however if you go down to a parallelsim of 1, only 1 pixel is transfered with a rate of 125 MHz.

    If your camera has a resolution of 1280x860, you are transfering 1.101 MegaPixel per Frame. Thus you will only be able to have a framerate of 113 FPS.

    I updated your design, and removed the parallelDN Operator. Furthermore, I added an Overflow operator. This operator has a property called "OverflowOccured". You can look at this parameter in MicroDisplay(X). If it is "1" an Overflow occured, meaning that your buffers are not large enough, or that some other bottleneck exists in your design.

    Speaking of bottlenecks that is often overseen is the DMA Transfer rate, which is 1.800 MB/s for the mE5 VCX QP. So the maximum you can achieve with your resolution is 1635 Hz ( (1800 MegaByte/s / 1280*860) ) - assuming you are using the full DMA Bandwidth. The PCI can transport up to 128 bits in parallel, thus when you have an 8bit image, you can use a parallelsim of 16. In your design it was still one, due to the paralleDN. This means, that only 102 FPS were able to be achieved.


    Regarding your question to the triggers:

    The standard acquisition applet has these functioanlities built in, when you are using your onw custom applet you are responsible for these implementations. You can find an example for the mE5 VCX QP in your VisualApplets installation folder:


    <VASINSTALLDIR>\Examples\Processing\Trigger\me5-MA-VCX-QP\Area


    You can copy the trigger functionality and the camera from there.


    Best Regards and a nice weekend


    Kevin


    Hi Jesse,

    I did some testing with OpenCV JPEG compression.

    Firstly, I will attach a design that has a chess board generator with uneven tiles, thus creating a test environment that has no artifacts in it. I adapted your original design, you can use it for testing, but I doubt that it will work in hardware.

    Furthermore, here is a short Python-Snippet for doing the testing I did:


    With this snippet I created the following plot:


    pasted-from-clipboard.png


    This is a visualization of the different artifacts introduced by Visual Applets and OpenCV, respectively.
    They both have a different implementation, therefore the shown artifacts are different.

    However, what is more important: In both cases the JPEG artifacts are diferent in the horizontal in the vertical direction with OpenCV and with Visual Applets.


    Therefore, your observation, that the artifacts are more visible on the horizontal edges than on the vertical edges does not show that there is a bug in the implementation but can be explained by the loss of information due to jpeg compression.


    For further questions on this matter, please refer to our support.


    Best Regards,

    Kevin
    Hi Jesse,

    Thank you for your input.

    The subsampling you implemented does the right job, however it is pre-jpeg compression. So the effect may take place during the jpeg compression.

    Lastly, did you use the output during simulation (from the green box) or did you build your application, put into the framegrabber and saved it from MicroDisplay or a C++ application?


    Best Regards,

    Kevin

    Hi Jesse,

    We are currently investigating this further.

    Just to double check:

    1. When you used C# for encoding, did you use subsampling as well?

    2. What did you use to decode the JPEG image? Did you write your own script?

    3. Did you decode the JPEG in the simulation or in hardware?


    Best Regards

    Kevin

    Hi Jesse,

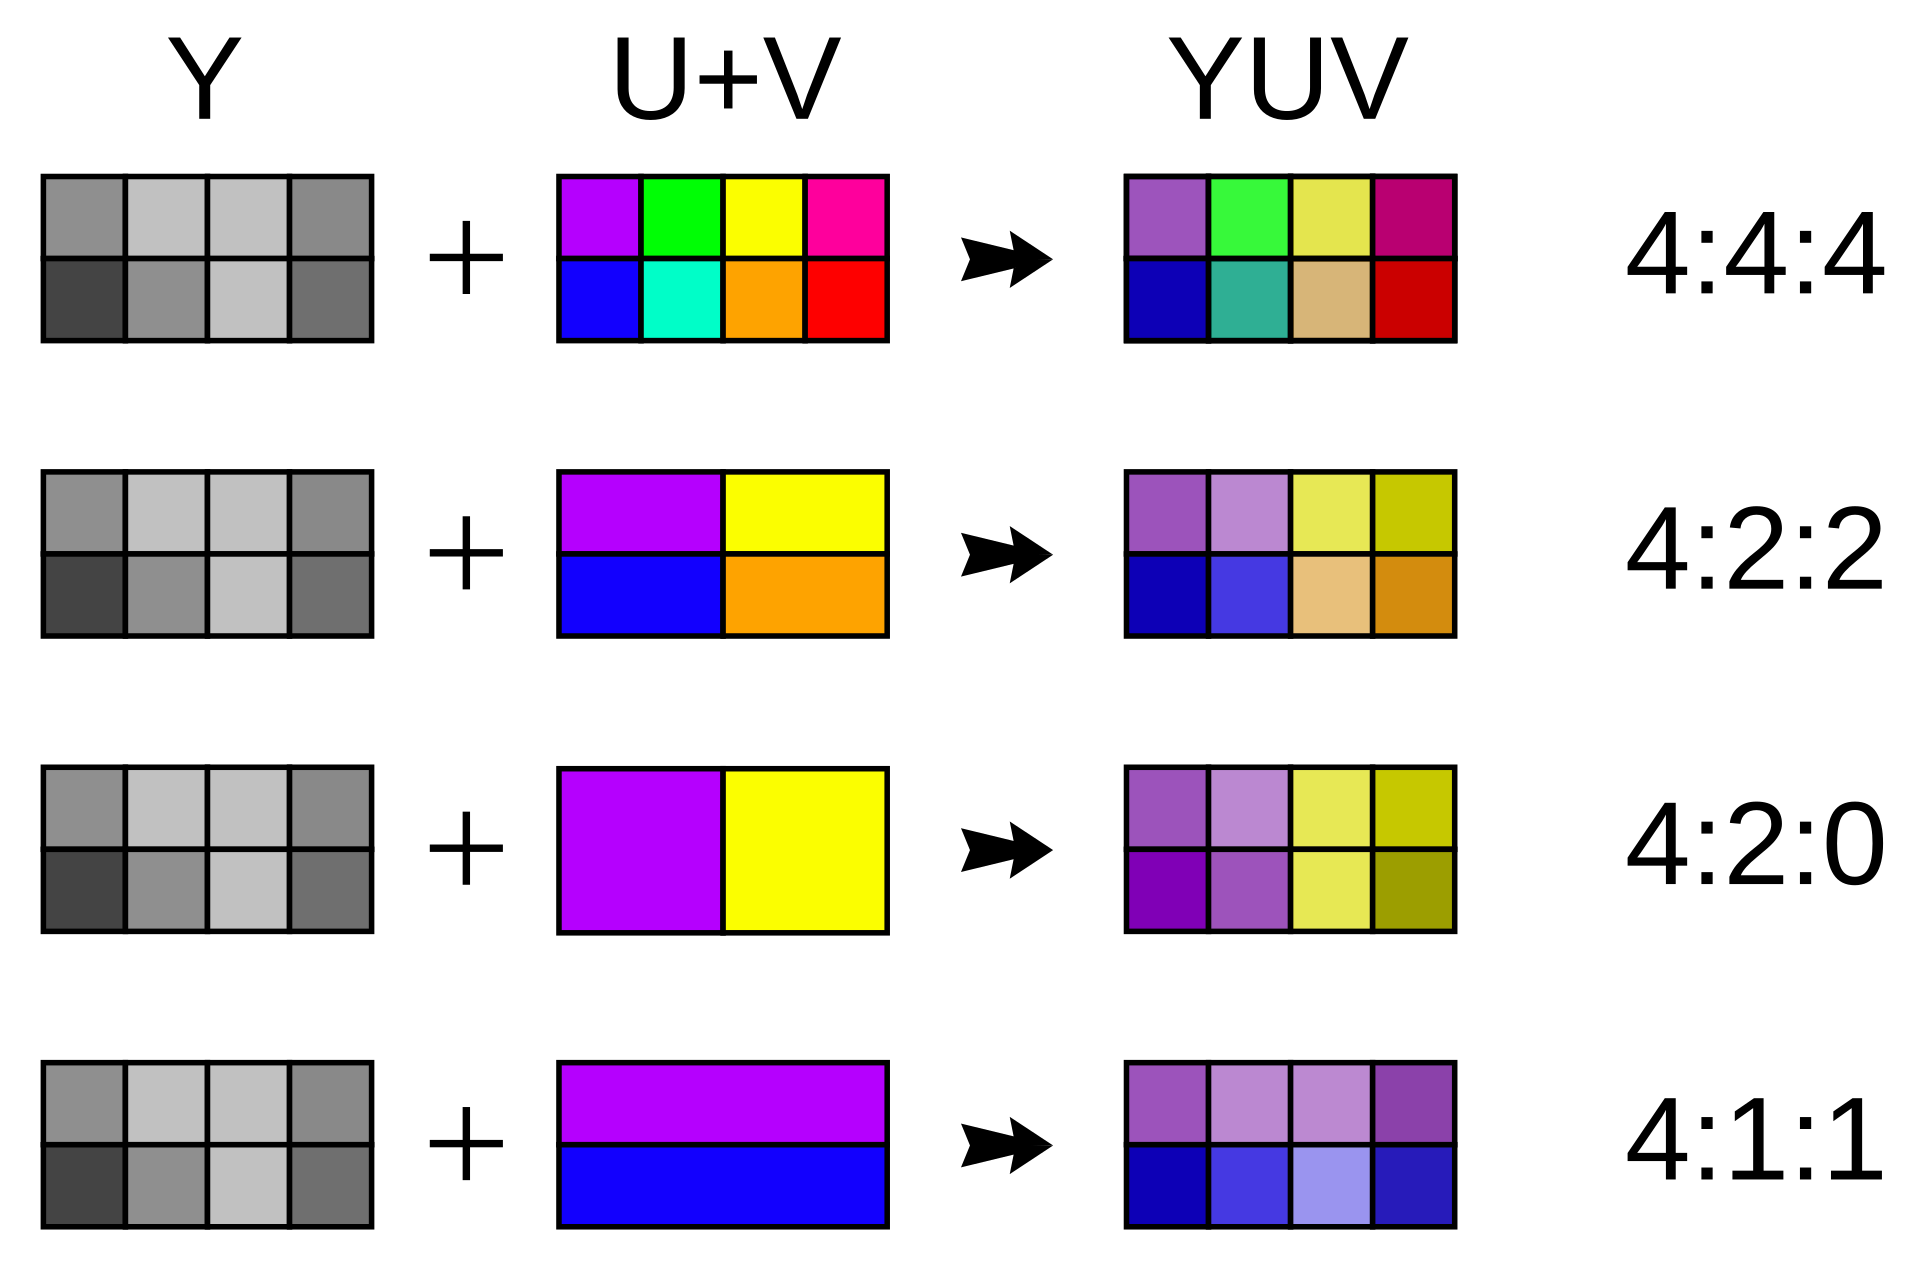
    We use 4:2:2 subsampling as in the picture shown below:

    1920px-Common_chroma_subsampling_ratios.svg.png


    This means that we filter out some information in the horizontal direction, but not in the vertical direction, which may explains your observed behaviour.

    If you need an other form of subsampling you may contact your appropiate sales manager for a custom request.


    Best Regards,

    Kevin

    Hi Jesse,

    I will ask the appropiate engineers at Basler and will come back to you as soon as I have the information available.
    Please be patient, due to holidays this may take some time.

    What I can tell you at the moment is, that depending on the input parallelism different block sizes are used. Which means that not all the time 8x8 blocks are utilized.

    Best Regards,

    Kevin

    Hi,

    The calculations on how large the output image will be is quite difficult. The Jpeg Algorithm works in a way that different cosine frequencies are stored. This means that the size of your output image is depending on your image you want to decode. Images that have a repeating pattern (e.g. a chess board) are easier to decode in comparison to images that have a high variance and a lot of edges. The worst possible image to decode in jpeg is probably an image just consisting of color noise.

    To understand JPEG better I highly recommend computerphiles videos on that topic:

    Part 1:


    Part 2:


    Most importantly, JPEG compression is NOT losless - which means you will never get the exact same image back after encoding / decoding - even with JPEGQuality set to 100. You will always include some so called "Jpeg artifacts" . These artifacts are most likely to occur on edges. You can read bout it here; https://en.wikipedia.org/wiki/Compression_artifact . This also explains the artifacts you experience in your image.

    Lastly, you can try it with different simulated images - what I did was simply use a Coordinate_X operator followed by a castbitwidth and set it to 8 to simulate a grayscale image. I attached my experimental synthetic image, so you may get the same size results as I did.


    Best Regards

    Kevin

    Hi,

    At the moment there is nothing planned in this direction.

    It is known that Python 3.6 has reached EOL, if there is a strong enough customer need we will implement support for higher Python Versions.

    Do you have a specific reasons for not using 3.6 ? If so, please tell us and we will let you know on how we will proceed.

    Best Regards,

    Kevin